

Runkeeper data in Salesforce
by Patrick Connelly posted on March 01, 2016
For the past couple of years I’ve dabbled in running and getting data from Runkeeper. I decided that I’d give it a try to have the entire process inside of Salesforce. This provided an interesting challenge for me, since it’s the first time I’ve setup the oAuth flow from Salesforce back to Salesforce. This post will likely be the first of a couple in this theme of pulling data from Runkeeper. The code included here is just a base for what can be done. I’ll be maintaining an updated version of the RunkeeperUtils class on my github, so make sure you check there for the most recent version of everything. So let’s go over how we can do this
How-to
Create a domain
While this step is not a hard requirement it is something that I highly recommend. This gives you additional security since without it anyone on the same pod could hijack your oAuth credentials (sorta). Additionally, this is a requirement for Lightning Component development anyway.
- Navigate to Setup -> Domain Management -> My Domain
- Choose your domain name (NOTE: Once this has been set it is difficult / impossible to change. So choose carefully)
- Click Check Availablity
- Check the agreement
- Click Register Domain
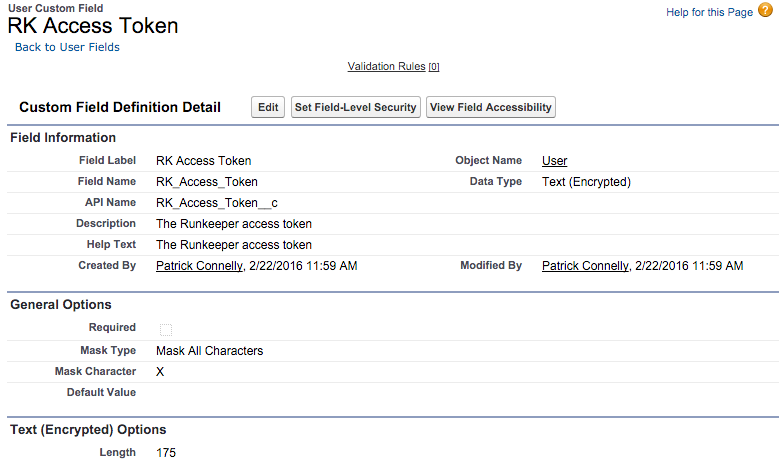
Add token fields
In order to save the access token for later use (and for automated processing) we need to create a field on the User record to store this data. We’ll create an encrypted text field. While the encryption is not entirely needed it will make it a little more difficult for the access token to fall into the wrong hands. This field is not a requirement either. You can feel free to pass the access token around and not store it anywhere.
Add remote site settings
In order to do callouts to Runkeeper we need to add two remote sites. This is because one is used for the oAuth flow and the other is used for all of our API calls.
- Navigate to Setup -> Security Controls -> Remote Site Settings
- Add an endpoint for
https://runkeeper.com - Add an endpoint for
https://api.runkeeper.com
Create a new app on Runkeeper
Start by registering a new app on Runkeeper’s site. While setting up this you will need to fillout the following fields
- Application Name: This can be whatever you want to call it. It will be displayed to your users as well as on their stream. It should be recognizable as the correct app when authorizing it.
- Description: This is the description of what your app does
- Organization: The organization name for the application*
- Application Icon: This is optional. It will be displayed at the time of authentication, so it would be nice to have
- Permission Requests:
- Read Health Information: This is the minimal permission needed for the code in this example
- Edit Health Information: This is required if you plan on making changes to any of the data
- Retain Health Information: This states that you are going to retain the information outside of the system and you will follow procedures for removal of any data if the user de-authorizes your application.
- Authorization Removal Callback URL: This is the URL that will be called when the user de-authorizes your application. I will try to cover this in a future post, but be aware that if you are going to retain health information you have to implement this so that you can remove the data.
- Estimated Date of Publication: This is only required if you plan on publishing your application on the Runkeeper apps page
For this example we only need to set Application Name, Description and Read Health Information
Create Runkeeper Utils
The heart of our operation is the Runkeeper utility class. This class is what makes all the calls to Runkeeper as well as creating the usable data structure to display the data later.
/**
* A utility class for interacting with Runkeeper
*
* @author Patrick Connelly (patrick@deadlypenguin.com)
*/
public class RunkeeperUtils {
	/** A map of the month to it's number */
	private static Map<String, Integer> MONTH_MAP = new Map<String, Integer>{
		'Jan' => 1,
		'Feb' => 2,
		'Mar' => 3,
		'Apr' => 4,
		'May' => 5,
		'Jun' => 6,
		'Jul' => 7,
		'Aug' => 8,
		'Sep' => 9,
		'Oct' => 10,
		'Nov' => 11,
		'Dec' => 12
	};

	/** The JSON result from a successful oauth call */
	public class OAuthResult {
		/** The access token */
		public String access_token { get; set; }

		/** The token type */
		public String token_type { get; set; }
	}

	/** The information about an activity */
	public class Activity {
		/** The start time */
		private String start_time;

		/** The distance in meters */
		public Double total_distance {get; private set;}

		/** The duration in seconds */
		public Double duration {get; private set;}

		/** The tracking mode */
		public String tracking_mode {get; private set;}

		/** The total calories burned */
		public Double total_calories {get; private set;}

		/** The source system */
		public String source {get; private set;}

		/** The entry mode */
		public String entry_mode {get; private set;}

		/** If GPS / path data exists for activity */
		public Boolean has_path {get; private set;}

		/** The type of the activity */
		public String primary_type {get; private set;}

		/** The URL for the activity in Runkeeper */
		public String uri {get; private set;}

		/**
		* Converts the distance from meters to miles
		*
		* @return The total_distance in miles
		*/
		public Double getTotal_distance_mi() {
			return (this.total_distance * 0.000621371).setScale(2);
		}

		/**
		* Converts the start time into a DateTime object
		*
		* @return The start_time in a DateTime format
		*/
		public DateTime getStart_time() {
			List<String> parts = this.start_time.split(' ');
			Integer y = Integer.valueOf(parts.get(3));
			Integer m = MONTH_MAP.get(parts.get(2));
			Integer d = Integer.valueOf(parts.get(1));
			List<String> t = parts.get(4).split(':');
			Integer h = Integer.valueOf(t.get(0));
			Integer mm = Integer.valueOf(t.get(1));
			Integer s = Integer.valueOf(t.get(2));

			return DateTime.newInstance(y, m, d, h, mm, s);
		}
	}

	/** The appication's client id */
	private static String CLIENT_ID = 'XXXXX';

	/** The appication's client secret */
	private static String CLIENT_SECRET = 'YYYYY';

	/** The API URL */
	public static String API_URL = 'https://api.runkeeper.com';

	/** The URL for getting the access code */
	public static String ACCESS_TOKEN_URL = 'https://runkeeper.com/apps/token';

	/** The URL for authorizing the request */
	public static String AUTHORIZE_URL = 'https://runkeeper.com/apps/authorize';

	/**
	* Replaces reserved words in the JSON to help with deserialization
	*
	* NOTE: Words like 'type' are reserved and must be renmaed for
	*       object based deserialization to work
	*
	* @param data The JSON
	* @return The updated JSON
	*/
	private static String fixReservedWords(String data) {
		return data.replace('"type"', '"primary_type"');
	}

	/**
	* Gets the authentication url
	*
	* @param redirect_url The url that the user should be redirected to after login
	* @return The url the user should be sent to in order to login
	*/
	public static String getAuthUrl(String redirect_uri) {
		Map<String, String> urlParams = new Map<String, String> {
			'client_id' => CLIENT_ID,
			'redirect_uri' => redirect_uri,
			'response_type' => 'code'
		};

		PageReference ref = new PageReference(AUTHORIZE_URL);
		ref.getParameters().putAll(urlParams);

		return ref.getUrl();
	}

	/**
	* Validates the oauth code
	*
	* @param code The code to validate
	* @param redirect_uri The URL to redirect to after successful validation
	* @return The oauth result
	*/
	public static OAuthResult validateCode(String code, String redirect_uri) {
		List<String> urlParams = new List<String> {
			'grant_type=authorization_code',
			'code=' + EncodingUtil.urlEncode(code, 'UTF-8'),
			'client_id=' + EncodingUtil.urlEncode(CLIENT_ID, 'UTF-8'),
			'client_secret=' + EncodingUtil.urlEncode(CLIENT_SECRET, 'UTF-8'),
			'redirect_uri=' + EncodingUtil.urlEncode(redirect_uri, 'UTF-8')
		};

		Http h = new Http();

		HttpRequest req = new HttpRequest();
		req.setEndpoint(ACCESS_TOKEN_URL);
		req.setMethod('POST');
		req.setHeader('Content-Type', 'application/x-www-form-urlencoded');
		req.setHeader('Accept', 'application/json');
		String body = String.join(urlParams, '&');
		req.setBody(body);

		HttpResponse res = h.send(req);
		return (OAuthResult)(JSON.deserialize(res.getBody(), OAuthResult.class));
	}

	/**
	* Makes a call to runkeeper to get data
	*
	* @param access_token The access token for the user
	* @param content_type The accept type
	* @param uri The URI for the request
	* @return the raw JSON data for the request
	*/
	private static String getRunkeeperData(String access_token, String content_type, String uri) {
		String endpoint = API_URL + uri;
		Http h = new Http();

		HttpRequest req = new HttpRequest();
		req.setEndpoint(endpoint);
		req.setMethod('GET');
		req.setHeader('Accept', content_type);
		req.setHeader('Authorization', 'Bearer ' + access_token);

		HttpResponse res = h.send(req);

		return fixReservedWords(res.getBody());
	}

	/**
	* Gets the recent activity for the given access token
	*
	* @param access_token The acces token for the user
	* @return A list of recent activities
	*/
	public static List<Activity> getRecentActivities(String access_token) {
		String data = getRunkeeperData(access_token, 'application/vnd.com.runkeeper.FitnessActivityFeed+json', '/fitnessActivities');
		Map<String, Object> dataMap = (Map<String, Object>)(JSON.deserializeUntyped(data));

		return (List<Activity>)(JSON.deserialize((String)(JSON.serialize(dataMap.get('items'))), List<Activity>.class));
	}
}
The code here is pretty straightforward Apex. To get it to work with your newly created Runkeeper app, you will need to update lines 93 and 96 with the Client Id and Client Secret from your Runkeeper apps page. Hopefully in future posts I’ll cover how to extend the Activity class for other Runkeeper calls.
Create Runkeeper Login Controller
This Visualforce controller is the base for the other Runkeeper Visualforce pages we create. It contains helper methods to check to see if the current user already has an access token as well as methods to redirect to our list page on successful login
/**
* A Visualforce controller for logging into Runkeeper
*
* @author Patrick Connelly (patrick@deadlypenguin.com)
*/
public virtual class RKLoginController {
	/** If we are handling the callback */
	private Boolean isCallback;

	/** The current user */
	protected User currentUser;

	/** If the current user has a token or not */
	protected Boolean hasToken;

	/** The url to redirect to for authentication */
	public String authUrl { public get; private set; }

	/**
	* Gets the current pages URL
	*
	* @return The current page's URL
	*/
	@testVisible
	private String getPageUrl() {
		String host = ApexPages.currentPage().getHeaders().get('Host');
		String path = ApexPages.currentPage().getUrl().split('\\?').get(0);

		return 'https://' + host + path;
	}

	/**
	* The constructor
	*/
	public RKLoginController() {
		this.isCallback = false;

		this.currentUser = [
			select RK_Access_Token__c
			from User
			where Id = :UserInfo.getUserId()
		];

		this.authUrl = RunkeeperUtils.getAuthUrl(this.getPageUrl());
		this.hasToken = (this.currentUser.RK_Access_Token__c != null);

		if (ApexPages.currentPage().getParameters().containsKey('code')) {
			this.isCallback = true;
		}
	}

	/**
	* If we are in a call back, fetch and save the access token for the user, then redirect to the list page
	*
	* @return The page to goto next
	*/
	public PageReference redirectOnCallback() {
		if (this.isCallback) {
			String code = ApexPages.currentPage().getParameters().get('code');
			RunkeeperUtils.OAuthResult result = RunkeeperUtils.validateCode(code, this.getPageUrl());

			this.currentUser.RK_Access_Token__c = result.access_token;
			update this.currentUser;

			return Page.RKList;
		}

		return null;
	}
}
For customization you should update Line 65 to point to whatever page you want to show Runkeeper data
Create Runkeeper List Controller
This controller just show an example of how to extend the login controller, redirect if the users does not have an access token and then how to user the Runkeeper utility class. This is where the bulk of your work would go for customization
/**
* A Visualforce controller displaying data from Runkeeper
*
* @author Patrick Connelly (patrick@deadlypenguin.com)
*/
public class RKListController extends RKLoginController {
	/** The recent activities for the user */
	public List<RunkeeperUtils.Activity> recentActivities { get; private set; }

	/**
	* The constructor
	*/
	public RKListController() {
		super();

		if (this.hasToken) {
			this.recentActivities = RunkeeperUtils.getRecentActivities(this.currentUser.RK_Access_Token__c);
			System.debug(System.LoggingLevel.ERROR, JSON.serializePretty(this.recentActivities));
		}
	}

	/**
	* If the user does not have a token log them in
	*
	* @return the page to goto based on the token availability
	*/
	public PageReference ensureHasToken() {
		if (this.hasToken) {
			return null;
		}

		return Page.RKLogin;
	}
}
Create Login Visualforce page
This Visualforce page has a very simple Runkeeper button to login. You can customize this by using the generate button app from Runkeeper’s site. You’ll want to just copy the image URL into the Visualforce page.
<apex:page controller="RKLoginController" action="{!redirectOnCallback}">
	<a href='{!authUrl}'><img src='http://static1.runkeeper.com/images/assets/connect-grey-white-200x38.png'/></a>
</apex:page>
This page is super simple. All of the heavy lifting lies in the redirectOnCallback method. This checks to see if we’re in a callback and if we are, store the access token on the User record and then redirect to the list page. If you did not want to store the access token on the User record you would want to update the controller and pass it to the next page however you want.
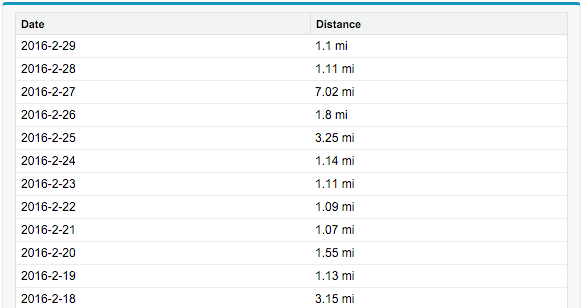
Create List Visualforce page
Now we can get to the “fun part.” This page checks to see if the user has an access token stored. If they do not then we bounce them to the login page. If they do, then we display there recent activities.
<apex:page controller="RKListController" action="{!ensureHasToken}">
	<apex:pageBlock>
		<apex:pageBlockTable value="{!recentActivities}" var="activity">
			<apex:column>
				<apex:facet name="header">Date</apex:facet>
				{!YEAR(DATEVALUE(activity.start_time))}-{!MONTH(DATEVALUE(activity.start_time))}-{!DAY(DATEVALUE(activity.start_time))}
			</apex:column>
			<apex:column>
				<apex:facet name="header">Distance</apex:facet>
				{!activity.total_distance_mi} mi
			</apex:column>
		</apex:pageBlockTable>
	</apex:pageBlock>
</apex:page>
Now you could easily modify this data however you want. If you wanted you could add a checkbox in the Visualforce page next to each activity and allow the user to select activities they want to save. Then you could store those into a custom object related to their user record. The sky’s the limit!
Next steps
Now that the groundwork is laid for the interaction for Runkeeper here are some things that I plan on doing and hopefully writing about
- Authorization Removal Callback URL: How to implement this so that when users deactivate the application you are notified and can remove their data
- Extending Activities: The current Activity class only contains the summary data. I’d like to cover how to extend that class to provide the fully Activity data and how to integrate that into saving the data to a custom object
- Automated Activity Tracking: Using scheduled Apex, run a job to fetch recent activities (such as for a run streak) and store that data.
- Additional Activity Types: How to extend the RunkeeperUtils class to work with the other supported activities such as strength training, sleep, etc