

Travis CI and Salesforce
by Patrick Connelly posted on April 22, 2015

Recently I started working on a project that required a Salesforce CI build system. This has not been a problem for me in the past because I’ve always had a Jenkins host that was setup and maintained by our admins. However, this is a public facing project and I needed something that everyone contributing could have access to.
Travis CI

I had heard of Travis CI before, but had never had a chance to look into it. Travis CI has most of the features that you would expect from any hosted CI solution, but where it drew me in was it’s pricing. It’s free. Well, it’s free if you’re using it for a open public project on GitHub (which I happen to be doing). They do have support for private GitHub repos, but you will have to pay to access them.
Solenopsis

Solenopsisis a project that Scot Floess and I have been working on for several years and it has been doing all of the deployment work for our team since it’s inception. Solenopsis is an extension of the Force.com Ant Migration tool that has a bunch of fancy Ant and Python scripts to help deploy code and manage all that pesky XML.
We’ll be using Solenopsis to deploy to Salesforce via Travis CI. While I use Solenopsis to pull data down and push it back up during development, there is no requirement on the end user using it in order to get the code in the repo. The only “requirement” is that is in the src directory so that we can use other directories to hold our build scripts and other build requirements. If you do use Solenopsis for personal it will make some things easier such as building out the .sfdcignore file which may be needed depending on your configuration.
Setting it up
Connecting Travis CI
Connecting Travis CI to your repo is as easy as logging in with your GitHub credentials, and toggling it on for the repo holding your Salesforce metadata. Once you’ve done that then we’ll need to set up Solenopsis, the build scripts and the environment variables.
Setting Up the Repo Structure
In order to prepare for our build scripts and the like we’ll need to create some new files. You’ll want to create the build directory and under it the scripts and ant directory.
- src
- build
    - ant
    - scripts
Adding Solenopsis
I’ve found that the best way to use Solenopsis with Travis CI is to add it to your repo as a submodule. This will ensure that every time that your repo is built, you have the most recent version of Solenopsis, and you can take advantage of the container features that Travis CI offers which will decrease your setup/teardown time between builds.
git submodule add git://github.com/solenopsis/Solenopsis.git build/solenopsis
Adding the Salesforce Jar
Solenopsis relies on the ant-salesforce.jar to do the deployments to Salesforce. This can be obtained by logging into your organization and going to setup ⇨ develop ⇨ tools and downloading the Force.com Migration Tool. Inside that zip file, there will be a ant-salesforce.jar. I recommend taking that jar and renaming it to something like ant-salesforce-33.jar to denote which version of the API it uses, so that you can easily upgrade/downgrade when the API version changes. Place this jar inside the build/ant directory.
Adding the Environment Variables
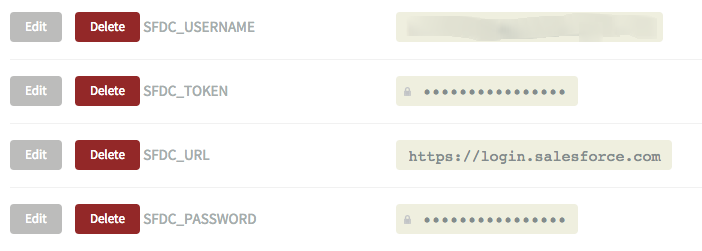
In order to keep our scripts free of any credentials and to make it more modular we need to add some environment variables to the Travis CI build. By clicking Settings ⇨ Settings ⇨ Environment Variables, we can add our variables in the web UI.
Any environment variables that are visible (IE not obfuscated) on the settings page will be available in your build logs for the public to see. So make sure that you set the “Display value in build logs” to off for passwords and tokens.
We’ll add four variables to our build to be able to log in to our instance.
- SFDC_USERNAME – The salesforce username
- SFDC_PASSWORD – The salesforce password
- SFDC_TOKEN – The access token for the user
- SFDC_URL – The login url for the instance
- For production, this will be https://login.salesforce.com
- For sandboxes, this will be https://test.salesforce.com
Adding the Before Script
Now that we have our environment variables configured we need to set up our Solenopsis configuration files. The two files we need are the ~/solenopsis.properties file and the instance’s credential files
To do this we’ll add the following script as build/scripts/setup_credentials.sh
#!/bin/bash

SOL_SANDBOXNAME="production"
SOL_PROPFILE="$HOME/solenopsis.properties"
SOL_HOMEDIR="$HOME/.solenopsis"
SOL_CREDDIR="$SOL_HOMEDIR/credentials"
SOL_CREDFILE="$SOL_CREDDIR/$SOL_SANDBOXNAME.properties"

SRC_DIR="$TRAVIS_BUILD_DIR/src"

cat >$SOL_PROPFILE <<EOF
solenopsis.ENVIRONMENTS=local $SOL_SANDBOXNAME
solenopsis.env.HOME=$SOL_HOMEDIR
solenopsis.env.MASTER=local
solenopsis.env.DEPENDENT=$SOL_SANDBOXNAME
solenopsis.env.local.HOME=$SRC_DIR

sf.antFile=$TRAVIS_BUILD_DIR/build/ant/ant-salesforce-33.jar
EOF

mkdir -p $SOL_CREDDIR

cat >$SOL_CREDFILE <<EOF
username = $SFDC_USERNAME
password = $SFDC_PASSWORD
token = $SFDC_TOKEN
url = $SFDC_URL
EOF
You will need to modify this to make sure that your ant-salesforce jar has the right name.
Adding the Install Script
Now that we have the information on the filesystem that Solenopsis need to do it’s magic we need to call it. Since we do not have it fully installed and are running it from the repo directly we’ll use the bash version of Solenopsis (bsolenopsis) instead of it’s python brother. This script will be saved as build/scripts/deploy.sh
#!/bin/bash

set -ev

SOL_ROOT="$TRAVIS_BUILD_DIR/build/solenopsis/scripts"

cd $SOL_ROOT
./bsolenopsis destructive-push
Setting the Script Permissions
In order for Travis CI to run this scripts we need to make sure that they have the execute flag set on them. You will need to figure out how to do this on your operating system or inside of your git client. For linux / OSX you can simply run
chmod a+x build/scripts/*
Writing the Travis CI YAML file
The YAML file is what tells Travis CI how to do it’s builds and what to call to do it. Since this Travis does not support Salesforce directly we are just going to set our build type as Python (it shouldn’t matter what you use). This file is saved as .travis.yml in the root of the repo. In our configuration we are only building in Travis for the master branch, but you can add more branches in this file. There are lots of additional options available for this file.
language: python
python: "2.7"
sudo: false
branches:
  only:
    - master
before_script: ./build/scripts/setup_credentials.sh
script: ./build/scripts/deploy.sh
Running it all
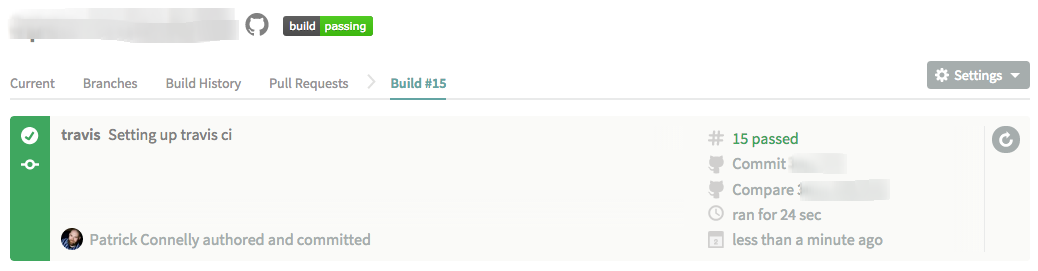
Now that we’ve got all of the scripts written you can push all of the new scripts to your master branch. This will cause Travis CI to fire off a new build and run all of the commands in the YAML file. And you will see it in your Travis dashboard
Next Steps
Once you have the CI setup, there are lots of things you could do to enhance your process
- Automate test runs – You can run all the tests in your organization by using bsolenopsis run-tests
- Add a CI status badge to your repo – Travis makes this real easy to do.
- Push test coverage to coveralls.io – After you run your tests you can push the code coverage to a second system such as coveralls.io. Hopefully I’ll have a post about this soon.
- Multiple environments – You can easily add more environment variables and modify both scripts to support sandboxes and multiple build environments. You can see what branch is currently being built by using the $TRAVIS_BRANCH environment variable