

JWT Bearer Authentication: Salesforce and Node
by Patrick Connelly posted on March 08, 2019

If you’ve done much API generation then you’ll that you don’t want to have to make your users authenticate multiple times just because your API is going somewhere external. For example, if you have an API that reaches into Salesforce but your app uses Google SSO, you don’t want to have to present an oauth screen to your user after they’ve already authenticated. To work around this, you can use a JWT Bearer flow to login on behalf of a user and get a access token to work with.
Generate private key and cert
To validate that you are who you say you are, this process needs you to generate an x509 certificate and key. Your JWT requests will be signed with this key and validate that you’re suppose to be able login as the user.
To generate the key and certificate run the following OpenSSL command
openssl req -newkey rsa:2048 -nodes -keyout key.pem -x509 -days 365 -out certificate.pem
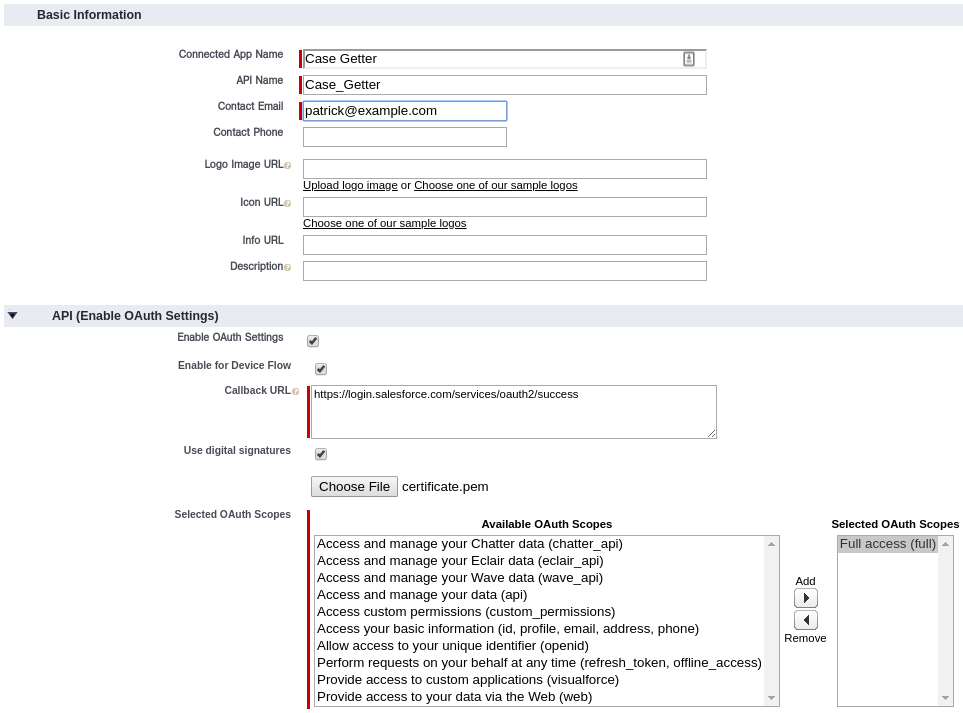
Create a Connected App
To connect to our Salesforce instance, we’ll need to create a connected app. How to start the process differs slightly if you are in Lightning vs Classic
- Create the connected app
- Lightning: Navigate to Setup ⇨ Apps ⇨ App Manager and click New Connected App
- Classic: Navigate to Setup ⇨ Create ⇨ Apps and click New under the Connected Apps section
- Pick a Name and fill in the Contact Email field
- Check Enable OAuth Settings
- Check Enable for Device Flow
- Check Enable digital signatures and choose the cetificate.pem file we created ealier
- Choose your OAuth Scopes depending on what your application is going to do
- Click Save
- Click Continue
From the view page of you copy the Consumer Key and Consumer Secret we’ll need them for future steps
- Click Manage
- Click Edit Policies
- Change Permitted Users to Admin approved users are pre-authorized
- Click Save
- Click Manage Profiles
- Select System Administrator
- Click Save
We’re choosing just the administrator profile for now. Once we’ve done our first login to the connected app, the list of profiles and permission sets can be changed. You’ll want to make sure that this is as restrictive as it can be. If you’re using JWT Bearer for something like external API for community users, restrict it just to that profile. Remember if your JWT key gets exposed, anyone with that key can impersonate any user with that profile / permission including System Administrators.
Authenticate Against Your Connected App
Before we can use our JWT flow with any user without prompting, we must authenticate at least once with the normal OAuth. There are several ways to do this but I’ve found that using cURL and a little bit of manual work does the job well enough. In the commands below, we’re going to use the Consumer Key and Consumer Secret from the previous steps.
curl -X GET -D - -o /dev/null "https://login.salesforce.com/services/oauth2/authorize?response_type=code&redirect_uri=https://login.salesforce.com/services/oauth2/success&client_id=<CONSUMER_KEY>"
Visit the Location URL in your browser and finish the OAuth flow of authenticating your user. This will then redirect you to a URL with a parameter of code. Copy that code and use it below.
curl -X POST "https://login.salesforce.com/services/oauth2/token?grant_type=authorization_code&redirect_uri=https://login.salesforce.com/services/oauth2/success&client_secret=<CONSUMER_SECRET>&client_id=<CONSUMER_KEY>&code=<CODE>"
Now you should be able to make JWT requests for other users without having to authorized the application.
Using JWT to get an access token
In order to get the access token we need to create a JWT request and sign it to validate that we are who we say we are. This is pretty easy to do in node with the jsonwebtoken package.
First we need to load our credentials and our key into memory
var privatekey = fs.readFileSync('certs/key.pem');
var credentials = require('./credentials.js');
Then we can generate our JWT parameters. You may not need to set exp manually but I did it just to be sure.
var jwtparams = {
    iss: credentials.salesforce.consumer_key,
    prn: credentials.salesforce.username,
    aud: credentials.salesforce.url,
    exp: parseInt(moment().add(2, 'minutes').format('X'))
};
Then we sign our token and generate our POST parameters
var token = jwt.sign(jwtparams, privatekey, { algorithm: 'RS256' });

var params = {
    grant_type: 'urn:ietf:params:oauth:grant-type:jwt-bearer',
    assertion: token
};
Now we can generate our request to get our access token and do something with it
var token_url = new url.URL('/services/oauth2/token', credentials.salesforce.url).toString();

axios.post(token_url, querystring.stringify(params))
    .then(function (res) {
        var conn = new jsforce.Connection({
            instanceUrl: res.data.instance_url,
            accessToken: res.data.access_token
        });

        conn.query('select CaseNumber, Subject from Case limit 1', function (err, results) {
            console.log(JSON.stringify(results.records[0])); // eslint-disable-line no-console
        });
});
You can see the full implementation on my Github.
Conclusions
Once you understand how to setup the connected app and you know that you have to authenticate against the app once using JWT is pretty easy. In a future post, I’ll combine the Google SSO with JWT to show how you can tie them together and get Salesforce data from a Google OAuth’d server.