Salesforce1 Actions with Visualforce
by Patrick Connelly posted on January 03, 2016
Salesforce1 Actions can be very powerful. Most of the examples I have seen regarding Salesforce1 Actions have been around Global Actions that show up on the home page. I recently had the chance to play around with object specific actions and found that combined with Visualforce pages they can be very powerful.
Goal
The goal of this post is to create two quick actions for the Lead object. One that will reject a lead and one that will accept a lead.

We will be doing this via a Visualforce page that has an onload action. This will be useful so that we can re-use this both for a standard page layout button as well as for our Salesforce1 Action
Apex Controller
The controller itself is pretty simple, we get the lead, we update the lead, we redirect back to the lead.
AcceptLead.cls
public class AcceptLead {
    public Lead l;

    /**
    * The constructor
    *
    * @param controller The standard controller
    */
    public AcceptLead(ApexPages.StandardController controller) {
        this.l = (Lead) controller.getRecord();
    }

    /**
    * The page action that will accept the lead
    *
    * @return The page to goto after loading
    */
    public PageReference pageAction() {
        this.l.Status = 'Working - Accepted';

        update this.l;

        return new PageReference('/' + this.l.Id);
    }
}
This contains our page action to move the Status of the Lead to Working – Accepted you could obviously do whatever you want in this method to update your lead, but setting the status is an easy example.
RejectLead.cls
public class RejectLead {
    public Lead l;

    /**
    * The constructor
    *
    * @param controller The standard controller
    */
    public RejectLead(ApexPages.StandardController controller) {
        this.l = (Lead) controller.getRecord();
    }

    /**
    * The page action that will reject the lead
    *
    * @return The page to goto after loading
    */
    public PageReference pageAction() {
        this.l.Status = 'Working - Rejected';

        update this.l;

        return new PageReference('/' + this.l.Id);
    }
}
This controller does the same as our Accept but sets the status to Working – Rejected instead.
Visualforce Page
Now that we have our controllers we’ll want to create our Visualforce page that runs the page action method on page load
AcceptLead.vfp
<apex:page standardController="Lead" extensions="AcceptLead" action="{!pageAction}">
</apex:page>
RejectLead.vfp
<apex:page standardController="Lead" extensions="RejectLead" action="{!pageAction}">
</apex:page>
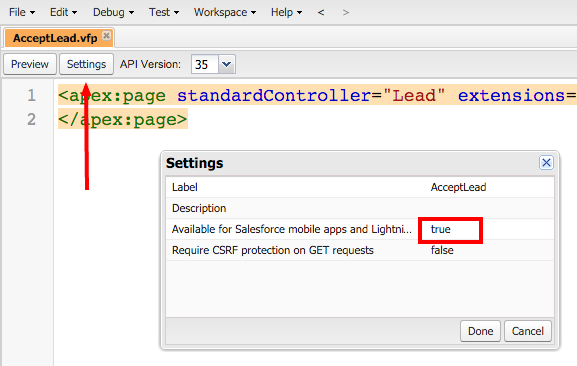
You will also want to make sure that your Visualforce page is available for Salesforce mobile apps and Lightning pages

Salesforce1 Actions
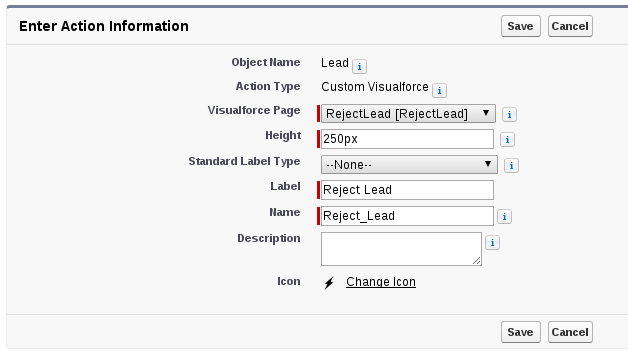
Now that we have our Visualforce pages created we need to make our Salesforce1 Actions. Goto Setup ⇨ Customize ⇨ Leads ⇨ Buttons, Links, and Actions ⇨ New Action. From here we’ll enter our Visualforce page information. Repeat this for both actions.

Then after saving the Action we’ll add it to the Salesforce1 and Lightning Experience section of our page layout

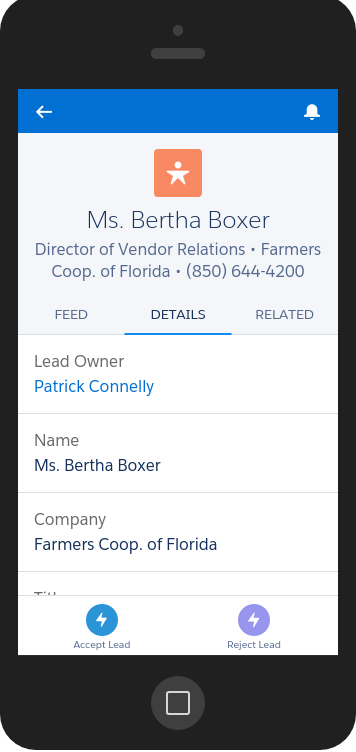
And then loading up a Lead in our Salesforce1 app, we’ll see our new actions!


