

OAuth Flow for service users in Salesforce
by Patrick Connelly posted on July 05, 2016

A very common use case for integrations with external systems is to have a service user that is authenticated and all subsequent interactions happen via that user. This flow is super easy when you can do username / password auth, but it becomes much harder when you’re only option is to use the oAuth flow.
Use Case
In a recent developer board post, a community user asked for help storing their credentials from the oAuth flow to box.com and then create a new folder whenever an account was created. The problem they were facing is that when you do the initial oAuth flow, you have to approve the use of the app and this requires human interaction. This is not something you can do inside of a trigger, so we’ll need to find another way to do it.
Custom Setting
To help aid in this, we’re going to create a custom setting to store our connection information as well as our access and refresh tokens. One very important thing to note is that these credentials to give someone the “keys to the kingdom” so be very careful with your permissions on these. We’ll start by creating the custom setting to contain all of our oAuth identifying information. We’ll do this as a List type so that we can reuse the code for multiple oAuth applications.
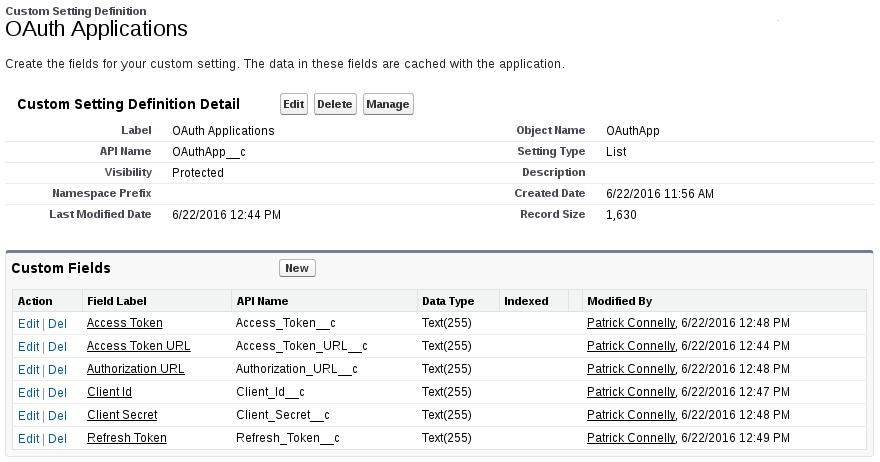
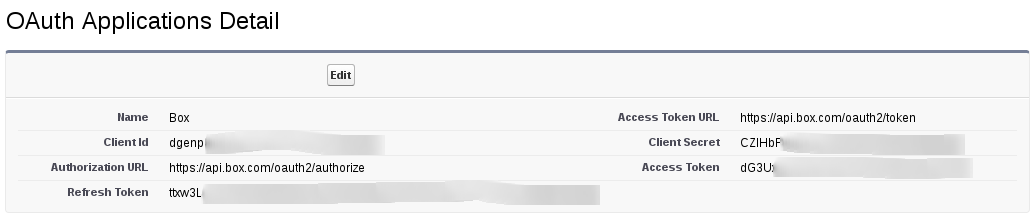
Now that we’ve defined our custom setting, we’ll need to populate it with some data. You’ll have to create a developer account for Box.com and create your application. From this page, you’ll want to grab your client id and client secret. As for the URLs, sometimes they are included on the credentials page, sometimes you’ll need to pull them from the API documentation
Object definition can be found here.
The oAuth Flow
Once we have the information needed to start the oAuth flow, we’ll need to authenticate using it. The short version of this is that we’ll send our application information to the oAuth endpoint, they will then return us a code that we can then authenticate with our secret key via an API call and get back an access token. This access token allows the application to make requests on a user’s behalf.
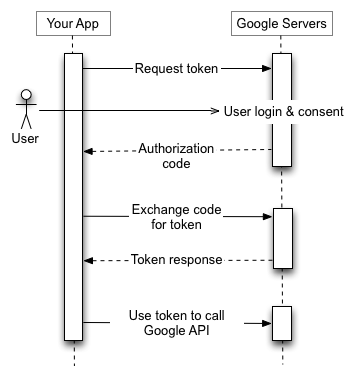
oAuth flow diagram from Google’s documentation on oAuth
In our use case, we can’t ask the user to login everytime because this is going to be used with a headless process. Because of that we need to store our service user’s access token on the custom setting to use it in the future.
The Code
With re-usability in mind, let’s take a look at an OAuthController we can use to do the oAuth flow. We’ll make a virtual class that we can then later extend for use in our specific instances.
public virtual class OAuthController {
    //Code will go here
}
Authorization URL
The first step in our oAuth flow is to request authorization from the user. To do this, we’ll create a login link that the user will use to login and grant access to our application
/**
* Gets the page url
*
* @return The page url
*/
@testVisible
private String getPageUrl() {
    String host = ApexPages.currentPage().getHeaders().get('Host');
    String path = ApexPages.currentPage().getUrl().split('\\?').get(0);

    return 'https://' + host + path;
}

/**
* Gets the authroization URL
*
* @return The authorization url
*/
public String getAuthUrl() {
    Map<String, String> urlParams = new Map<String, String> {
        'client_id' => OAuthApp__c.getValues(this.application_name).Client_Id__c,
        'redirect_uri' => getPageUrl(),
        'response_type' => 'code'
    };
    String auth_url = OAuthApp__c.getValues(this.application_name).Authorization_URL__c;

    PageReference ref = new PageReference(auth_url);
    ref.getParameters().putAll(urlParams);

    return ref.getUrl();
}
This method will get the information from the custom setting and generate a url.
Callback and Code Validation
After the user grants access to the application, it will redirect back to our Visualforce page. We’ll then pull the code out of the URL, validate it and then store the access token.
/** The JSON result from a successful oAuth call */
public class OAuthResult {
    /** The access token */
    public String access_token {get; set;}

    /** The refresh token */
    public String refresh_token {get; set;}
}

/**
* Validates the oAuth code
*
* @param code The code to validate
* @param redirect_uri The URL to redirect to after successful validation
* @return The oauth result
*/
public OAuthResult validateCode(String code, String redirect_uri) {
    String client_id = OAuthApp__c.getValues(this.application_name).Client_Id__c;
    String client_secret = OAuthApp__c.getValues(this.application_name).Client_Secret__c;
    String access_token_url = OAuthApp__c.getValues(this.application_name).Access_Token_URL__c;

    List<String> urlParams = new List<String> {
    	'grant_type=authorization_code',
    	'code=' + EncodingUtil.urlEncode(code, 'UTF-8'),
    	'client_id=' + EncodingUtil.urlEncode(client_id, 'UTF-8'),
    	'client_secret=' + EncodingUtil.urlEncode(client_secret, 'UTF-8'),
    	'redirect_uri=' + EncodingUtil.urlEncode(redirect_uri, 'UTF-8')
    };

    Http h = new Http();

    HttpRequest req = new HttpRequest();
    req.setEndpoint(access_token_url);
    req.setMethod('POST');
    req.setHeader('Content-Type', 'application/x-www-form-urlencoded');
    req.setHeader('Accept', 'application/json');
    String body = String.join(urlParams, '&');
    req.setBody(body);

    HttpResponse res = h.send(req);
    return (OAuthResult)(JSON.deserialize(res.getBody(), OAuthResult.class));
}

/**
* Validates the callback code and generates the access and refresh tokens
*
* @param location where to redirect to after success
* @return null to refresh the page
*/
public PageReference redirectOnCallback(PageReference location) {
    if (this.isCallback) {
        String code = ApexPages.currentPage().getParameters().get('code');
        OAuthResult result = validateCode(code, this.getPageUrl());

        OAuthApp__c creds = OAuthApp__c.getValues(this.application_name);
        creds.Access_Token__c = result.access_token;
        creds.Refresh_Token__c = result.refresh_token;
        update creds;

        return location;
    }

    return null;
}
In our redirectOnCallback method, we’ll check to see if we’re currently in a callback (this is set in the constructor) and if we are, we’ll validate the code. To validate the code, we’ll make a callout to the token URL with our client information. If we the code is valid and our request works, we’ll get an access token and a refresh token back. We’ll then store that into our custom setting.
Note: This code does not handle if the request is bad and will fail silently
Putting it all together
Once we have the full class (along with some helper methods that are not show above), we can start to use it. To use it with our Box oAuth, we’ll simply extend the OAuthController and define our new redirectOnCallback method that says where to go next
public class BoxController extends OAuthController {
    @TestVisible private static String APPLICATION_NAME = 'Box';

    public BoxController() {
        this.application_name = APPLICATION_NAME;
    }

    /**
    * Validates the callback code and generates the access and refresh tokens
    *
    * @return null to refresh the page
    */
    public PageReference redirectOnCallback() {
        return super.redirectOnCallback(null);
    }
}
Now that we have our controller, we’ll need to generate a Visualforce page to display the login link and start the oAuth flow.
<apex:page controller="BoxController" action="{!redirectOnCallback}">
    <apex:outputPanel rendered="{!NOT(hasToken)}"><a href='{!authUrl}'>Login</a></apex:outputPanel>
    <apex:outputPanel rendered="{!hasToken}">Already has token</apex:outputPanel>
</apex:page>
Now once we click on “Login” we’ll navigate through the oAuth flow and store our access token in our custom setting for use later.
Using the access token
This all may seem a long way to do this, but now we have our access token stored somewhere that we can consistently access it. So let’s add a method to our BoxController (this could be done in something like a BoxUtils, but just for simplicity we’ll keep it in one location.
private class ParentFolder {
    public String id;

    public ParentFolder(String id) {
        this.id = id;
    }
}

private class Folder {
    public String name;
    ParentFolder parent;

    public Folder(String name, String parentId) {
        this.name = name;
        this.parent = new ParentFolder(parentId);
    }
}

/**
* Static method to create the folder inside of the box account
*
* @param accountId The account id to create the folder for
*/
@Future(callout = true)
public static void createFolder(Id accountId) {
    String access_token = OAuthApp__c.getValues(APPLICATION_NAME).Access_Token__c;
    Folder folder_info = new Folder(accountId, '0');

    HttpRequest request=new HttpRequest();
    request.setEndpoint(FOLDER_URL);
    request.setMethod('POST');
    request.setHeader('Authorization', 'Bearer ' + access_token);
    String body = JSON.serialize(folder_info);
    request.setBody(body);

    Http p = new Http();
    HttpResponse response = p.send(request);
}
The full BoxController can be found here.
This new method will create a folder based on the accountId we are passed in inside of our Box.com account. But we need to call this from a trigger. The trigger below will create a new folder anytime an account is created
trigger BoxInsert on Account (after insert) {
    for (Account a : Trigger.new) {
        BoxController.createFolder(a.Id);
    }
}
Conclusions
The first time you have to deal with the oAuth flow, it’s pretty intimidating (and it stays pretty intimidating for the next two or three more times you deal with it). However, using the code above should make it much easier to consistently add and connect to oAuth applications as a server level user. This approach may seem like overkill if you are familiar with cURL and know the flow, since you could do this directly and just store the token, but I feel this can help those who aren’t familiar with the oAuth flow and don’t know cURL.