
Tracking water softener, water and air filters in Home Assistant
by Patrick Connelly posted on November 06, 2020
One of the things I’m terrible about remembering is changing air filters and I leave them in for way to long. And with our recent move into the new house not only do I have more air filters and a fridge water filter but now I have a whole house water filter, water softener and UV filter to keep track of. I’ve been spending a bunch of time working on my Home Assistant and I decided that since I use this system multiple times a day, I might as well track these filter’s life span on the same platform
Prerequisite
We’ll be using the time_date integration and unfortunately this isn’t included by default in Home Assistant. You’ll have to add a sensor for it via the configuration.yaml file. I have all my sensors loaded from a folder so I added a time_date.yaml file to load the sensor
- platform: time_date
  display_options:
    - 'time'
    - 'date'
Only date is required for this, but having time is useful for other things so I included it too.
Air and Water Filters
These filters are the simplest. You simply have two variables, when you installed the filter and how long the filter lasts and one output, how long until you need to change it.
Filter variables
To start will have to create two helper variables in Home Assistant. You can either create them via the UI under Configuration → Helpers or via YAML. I’ll include the YAML below because it’s the easiest way to describe what’s happening.
Installation Date
We’ll start with an input_datetime that marks when we last installed / changed the filter
input_datetime:
  air_filter_installed:
    name: Air Filter Installed
    icon: mdi:air-filter
    has_date: true
    has_time: false
Since we don’t need to be more granular than the day we just need to set has_date.
Filter Life
Next we’ll create input_number to store the number of days that the filter lasts for.
input_number:
  air_filter_lifespan:
    name: Air Filter Lifespan
    initial: 90
    min: 0
    max: 365
    step: 1
    mode: box
    unit_of_measurement: days
    icon: mdi:history
Output Templates
Days Remaining
Now that we have these two variables, we can calculate the days we have lift on our filter
- platform: template
  sensors:
    air_filter_days_remaining:
      friendly_name: Air Filter Days Remaining
      unit_of_measurement: days
      icon_template: 'mdi:calendar-clock'
      value_template: >-
        {%- set inst = as_timestamp(states('input_datetime.air_filter_installed')) -%}
        {%- set dif = states('input_number.air_filter_lifespan') | int * 86400 -%}
        {%- set nt = as_timestamp(states('sensor.date')) -%}
        {{ (((inst + dif) - nt) / 86400) | round(0) }}
Automation
To make life a little bit easier, we can add an automation that sets the input_datetime.air_filter_installed to today so that when we change the filter we can click a single button and reset our count.
alias: AC - Set change date to today
description: ''
trigger:
  - platform: event
    event_type: mobile_app_notification_action
    event_data:
      action: AC_FILTER_CHANGED
condition: []
action:
  - service: input_datetime.set_datetime
    data:
      date: '{{ as_timestamp(now())|timestamp_custom(''%Y-%m-%d'') }}'
    entity_id: input_datetime.air_filter_installed
mode: single
Note: I’ll explain the AC_FILTER_CHANGED event in a later post, but it’s used for actionable notifications
Displaying the Data
And now we just add our installation date, our template sensor and our reset filter button to Lovelace
type: vertical-stack
cards:
  - type: entities
    entities:
      - entity: input_datetime.air_filter_installed
      - entity: sensor.air_filter_days_remaining
        icon: 'mdi:calendar-clock'
  - type: button
    tap_action:
      action: call-service
      service: automation.trigger
      service_data:
        entity_id: automation.ac_set_change_date_to_today
    icon_height: 30px
    name: Reset Filter
    icon: 'mdi:refresh'
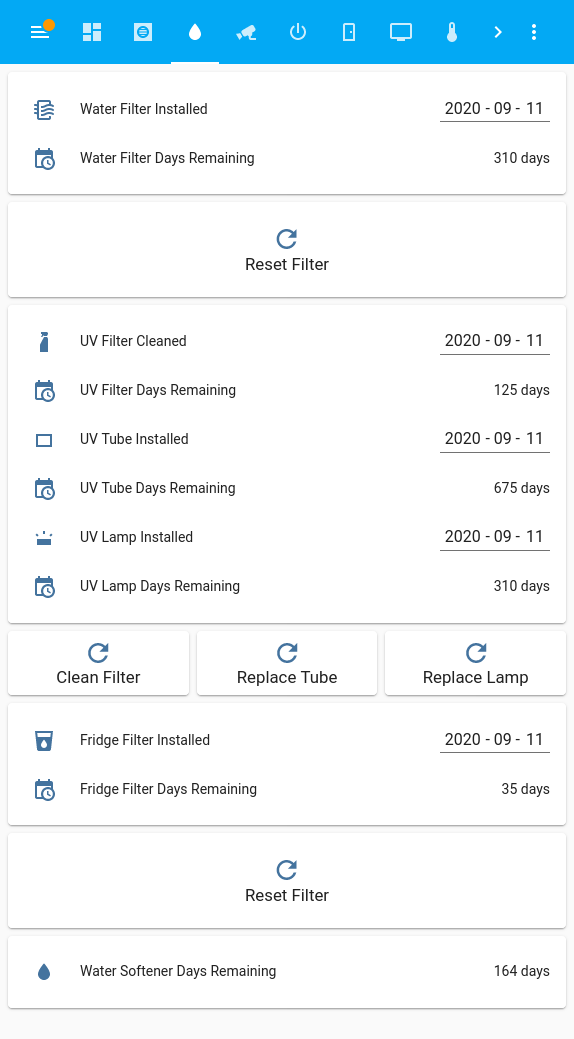
And we’ll get our data on our dashboard
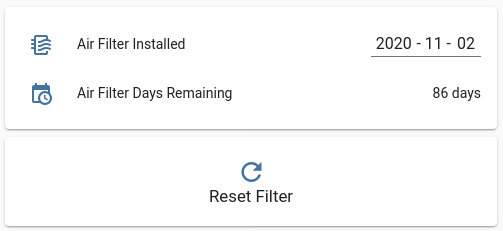
And we can repeat the same steps for all of our other filters with different lifespans.
Water Softener
If you’re not familiar with a water softener, you use a process to remove metal ions from the water extending the life of your pipes and making it so you don’t get some buildup in your shower. Because the water softener salt crystals get used at a varying rate, the softener has a small LCD display on it that shows you the number of days remaining. This number can shift over time as your water usage goes up or down and as the salt is used and flushed. Because of this variability we cannot simply use an input_number like we did for the filters but we instead have to read the LCD screen. And, like all my water filtration parts, this sits in my crawlspace and is inconvenient to get to and check the screen.
Hardware
Fortunately I have an old Foscam FI9821P camera that I mounted to the floor joists in my crawlspace and pointed it at the screen. Because it’s very dark in there and I didn’t want to leave all of my crawlspace lights on all the time, I 3d printed a bracket to hold a strip of LEDs powered by a 12v DC adapter to light up the screen. After importing the camera into Home Assistant I get this image.
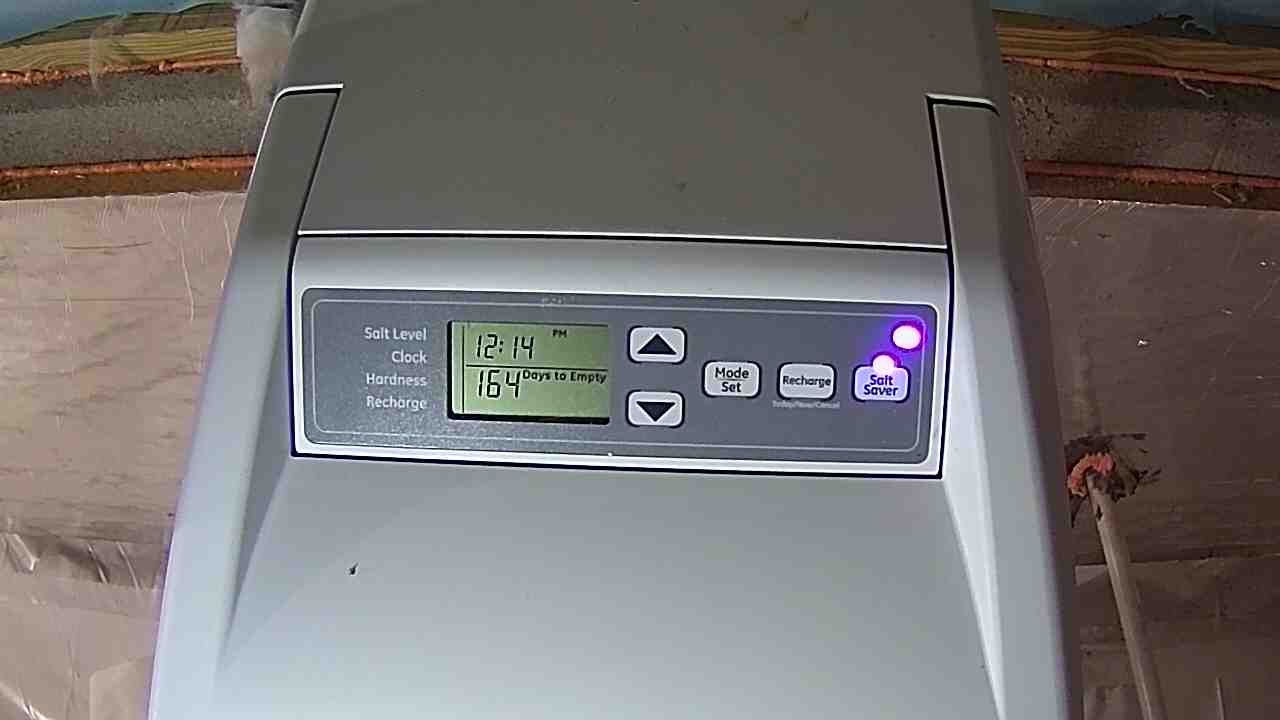
If I were to make any changes to this setup, I would get a better camera or one with optical zoom as the total number of pixels that the LCD screen takes up is fairly small. Also, an important note, you do have to have the real sensor on for this to work. Having an IR sensor pointed at the LCD screen will not show anything on the camera.
Trimming the Image
Now this image is good, but there’s too much for Home Assistant to know what the number we’re looking for is. So we need to trim the image to get a precise spot to pass over to the OCR program.
Starting in GIMP I find the top left corner of the 164 number I’m trying to parse and that lives at 466,370 and then I measure over to the bottom right corner and find that my LCD screen is 36 pixels high and 56 wide. To confirm that I’m cropping the image correctly I pass it into ImageMagick with and get the image out
convert camera.crawlspace.jpg -crop 56x36+466+370 camera.crawlspace_crop.jpg

Now that we know our image we can pass it off to ssocr. You can install it by following the instructions on the seven_segments documentation. If you have issues with compiling ssocr, read over the INSTALL file. We can run ssocr against our camera image and see what it outputs as well as what it “sees” by adding the --debug-image flag.
./ssocr --debug-image=/tmp/testbild.png crop 466 370 56 36 make_mono -t 43 -d -1 /tmp/camera.crawlspace.jpg

I found that playing with the threshold provided the results I needed to output the 164 to the command-line.
Adding the Water Softener to Home Assistant
Now that we have our camera and know where and how to pass it to ssocr we need to add it to Home Assistant via the seven_segments integration.
image_processing:
  - platform: seven_segments
    source:
      - entity_id: camera.crawlspace
        name: water_softener_ocr_segments
    extra_arguments: make_mono
    x_position: 466
    y_position: 370
    height: 36
    width: 56
    threshold: 43
    scan_interval: 10000
And then we add a template sensor to make it easier to add to our dashboard
- platform: template
  sensors:
    water_softener_days_remaining:
      friendly_name: Water Softener Days Remaining
      unit_of_measurement: days
      icon_template: 'mdi:water'
      value_template: '{{ states("image_processing.water_softener_ocr_segments") }}'

Wrap Up
Now that we have these sensors we can send alerts to buy new filters and to change them when they’re getting close to being used up. I also repeated these all of these steps for all of the parts of my water filtration system to give me a dashboard for all of my water